1. Prepare a stitched 360° video
SphereCut currently edits one source clip per project. For a typical 360° workflow, use a stitched monoscopic equirectangular panorama, usually with a 2:1 frame. A filename or MOV extension alone does not prove that a video is HDR.
- Stitch raw dual-lens footage in the camera maker’s software first. Proprietary .360 input is not imported directly.
- For a large 5.3K or 8K source, keep the original in a stable PC folder. Do not rename or move it while the project is in use.
- Use direct phone import for a manageable supported file. If projection metadata is missing, select 360° ERP only when the file really contains a full panorama.
2. Send a working copy from PC to phone
The PC makes a small copy of the full panorama. Your phone does not need to decode the 8K original. Transfer uses the local network; both devices must be able to reach each other.
- Open SphereCut PC, drop the original video into its import tile and wait for the working copy and QR code.
- Connect the phone and PC to the same home network. Avoid guest Wi-Fi with device isolation; a PC connected by Ethernet can share the same router.
- On Android choose Receive from PC (QR), scan the displayed code and confirm Open. Keep the PC session open for returning the edit.
3. Choose Lite and reopen your project
Lite reduces preview and tracking work for modest phones, including models with 6 or 8 GB RAM. It does not change the source stored on the PC. Complex footage and long exports can still take time.
- Choose Lite in the Android performance settings. Close unnecessary background applications if the phone struggles.
- Open the project from Recent projects. Its thumbnail helps identify the shot, and its duration reflects trim and slow motion.
- For a project received from PC, edit the working copy. HDR originals use an SDR preview; the original’s HDR is handled at the final PC render.
4. Frame the subject, including 9:16
Open Frame to choose a camera and its output shape. Drag the paused picture to look around; pinch to change the field of view. The camera represents a view inside the sphere, not a destructive crop of the source.
 9:16
- Choose portrait 9:16 for a vertical film, landscape 16:9 for a wide film, or another available shape.
- Drag to centre your subject and pinch until the framing is useful. Check headroom and the edges in the actual output shape.
- To animate the view, open Points, move to a time, add a point and change the framing. Review the movement before adding more points.
5. Use the timeline without tiny movements
The timeline uses source time. Pinch to enlarge it, drag to seek and use the larger trim handles to set the beginning and end. Precision controls move by a frame when a small adjustment matters.
- Close the contextual tool panel when you want a larger preview. Reopen the tool from the bottom icon bar.
- Zoom the timeline before moving a close point or trim edge. Use the precision controls instead of trying to drag a few pixels.
- Review the full edited playback. A slowed second occupies more time in the exported movie even though its position on the source timeline is unchanged.
6. Follow a subject or steer with your phone
Tracking follows a visible detail and can need manual correction after an occlusion or a large change of appearance. Phone steering lets you create camera movement yourself by turning the device.
- In Motion, start subject tracking, frame a recognisable detail and scan. When tracking becomes uncertain, move to a frame where the subject is visible, place the target again and continue.
- Create a tracked camera when the result is useful. Its camera points remain editable.
- For manual steering, choose Steer with phone, record while turning the phone, then review and save the take. For a brief Look back, hold its button, turn the phone and release to return smoothly.
7. Cut between two views with your thumb
Thumb cut switches between two cameras from the same source panorama. For example, frame a boat in view A and the pier in view B. It is not a tool for joining two unrelated video files.
- Open Cut, choose two cameras or add a second one, and frame each view.
- Play the clip and tap A or B at the desired cut points. A tracked camera keeps its motion while the other view is on screen.
- In Finish film choose the thumb-cut sequence. Check the full sequence, its aspect ratio and its audio before rendering.
8. Add two, three or more slow-motion sections
In Android 0.12.1, open Speed and choose ½× or ¼×. One source second becomes two or four seconds in the output. The speed edit applies to the project’s views and preserves audio pitch.
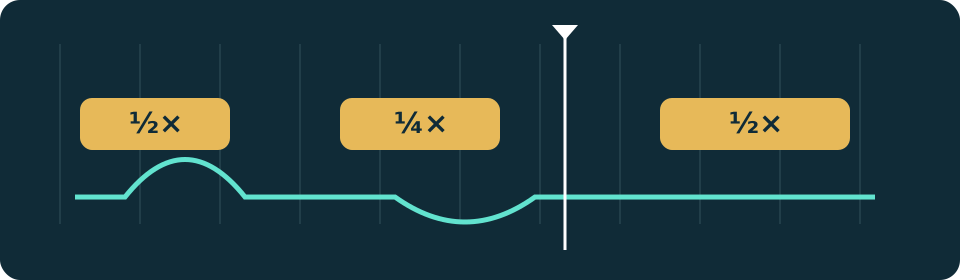
- Move to the desired time, choose a speed and tap Add slow motion. Playback begins. Tap End section at the desired end.
- Move to another time and repeat. If the playhead is inside an existing slowed section, the panel shows the next available normal-speed start; existing sections stay saved.
- To remove only one section, tap its yellow timeline band or its time chip, then Remove slow motion. Use Undo if you remove the wrong one.
9. Combine several camera effects
Open Effects directly from the bottom bar. Choose a duration of 2, 4 or 6 seconds. From Android 0.12.1, each tap adds an effect to the current camera’s saved movement instead of replacing the previous choice.
- Place the playhead and tap Dramatic push for a zoom movement or Camera sway for a gentle directional movement.
- Move further along the timeline and add another effect. You can also combine movements over the same time interval; inspect the result before continuing.
- Planet reveal is an introductory transformation starting at the clip’s beginning. Add it once to a camera, then combine it with other movements. Undo the last change to try a different result.
10. Finish on the phone or from the original on PC
Finish film distinguishes a quick export of the phone’s working copy from rendering using the PC original. Use the original for final detail, large output and supported HDR.
- Open Finish film, choose the camera or thumb-cut sequence and check output shape, size and audio. A mobile proxy export is useful for a quick preview.
- For a PC-linked project, send the edit back to PC. Wait for the received-edit status, then use Render from original in the Windows program.
- Open the completed video and inspect its first and last seconds, cuts, slow sections and sound. The Windows finish actions can also open or send the finished file to DaVinci Resolve.
11. Recover edits, update and keep storage tidy
Use Undo/Redo while editing and automatic project versions when you need to revisit an earlier saved state. Keep your original video and completed exports separately from disposable project working files.
- If a result looks wrong, undo the last change and replay that part before adding more edits. Reopen a saved project to confirm the intended state.
- In Windows Project management, reopen a project or move an old project to the Recycle Bin. The app preserves originals and finished videos outside the managed project folder.
- Use the Windows download card in Android Home or Settings for the current PC package. Windows 0.8.2 and later can offer an update at startup; download and installation start after your update action.
Start with the official apps
The Windows button always leads to the current public PC package. Keep both apps updated before using a new workflow.